 |
| sheet 9 |
On the left I cut out freehand circles and laid them at random.On the right I twisted the paper then laid them down into circles.
 |
| sheet 10 |
On the left I rolled small pieces of tissue into balls before laying a sheet over the top of them.
On the right twisted strips were similarly treated.
 |
| sheet11 |
On the left I rolled some tissue and cut into length ,then glued a sheet over them.
On the right I poked holes in a sheet of tissue before stretching while I glued it to show the holes .
 |
| sheet 12 |
On the left I rolled and cut lengths ,which were then twisted in the middle and stuck down at random.
On the right I cut strips and pushed them into the glue forming pleats.
 |
| sheet 13 |
On the left I pleated a sheet and stuck down.
On the right I simply stuck a sheet which formed creases.
I have sorted out some of the books which may be useful as reference in this module and include them here.
I have also included more trees captured on our local cycle track and one from outside the British Museum yesterday,looking up into it.
It is not until you start to look closely ,that you realise how varied the textures there are to be found in bark.
They have an astonishing range of colours ,but we are not concerned with that here.
I will sift through the various tree barks and play a little more on Paint Shop before making my choice as to what I will choose to interpret in paper.I think these are going to be some of the textures I will work with in different papers.
Some have been played with on Paint Shop and others have just been greyscaled.
I think there is enough variety to be able to play around with different effects.
I wish I could rely on blogger behaving when I want to add things.It has left large gaps between items and try as I might it won't correct.Am I being dense and doing something wrong?
I took some sheets of tissue paper and set the machine to a gathering stitch .I stitched long parallel lines before treating them in different ways.
1.A sheet stitched as described then pulled up into gathers before sticking down.
2.A sheet stitched in parallel lines at right angles to each other.
They were then gathered to create "bubbles " of loose paper.
2.A sheet stitched in parallel lines at right angles to each other.
They were then gathered to create "bubbles " of loose paper.
3.Strips of gathered paper woven together.
4.Strips of paper gathered to form circles.
4.Strips of paper gathered to form circles.
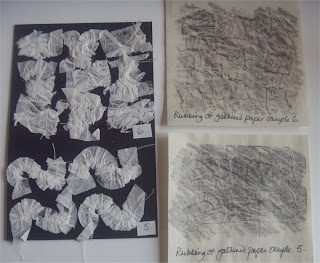
5.Strips of paper gathered and allowed to form curves.
6.Strips of paper gathered and cut into short lengths before being arranged one vertical,one horizontal.
6.Strips of paper gathered and cut into short lengths before being arranged one vertical,one horizontal.
I thought it would be interesting to see if I could get reasonable rubbings from the samples.I used a graphite stick and newsprint.I was pleasantly surprised at how good they were .
I went on to start to use some of the previous images to translate into paper textures .They will be uploaded another time as they have to dry.


2 comments:
Nice manipulation! You are not the only person who finds blogging frustrating. I can never get the effect I want and everything takes SOOOOOOOOOOOOOO long.
I love your work on tree bark - and blogger has a mind of it's own I think!
Post a Comment